Thursday, June 30, 2011

July Stamp of the Month Blog Hop!


Welcome to our July Stamp of the Month Blog Hop! We are featuring D1458 American Celebration, a set of 12 absolutely patriotic stamps!


If you have come here from Helen Onulak's Blog, you are on the right path!  You can find a list of all the partipant's in case you get lost here: http://bowlofstamps.blogspot.com/p/sotm-blog-hop-list.html

This month we have over 60 Close To My Heart Consultants sharing their creations using this month's SOTM and other great CTMH products on their blogs. This is simple to do - just click on the link at the end of the post on each blog to move to the next one! Here we go!

Now "Hop" on over to Judy Burger's blog to see her beautiful eye candy! Be sure to visit all the Consultants at their Blogs to get some great crafting ideas and other fun ideas! Remember, the SOTM is only available until May 31st!  Contact your CTMH Consultant (or click here) to see how you can get this stamp set at a discount or even free!
* * *

Below is one of the ways I decided to use this stamp set.  It is a standard size card.  Note that you can click on the picture to see details.


I just love the new Kraft papers!  Kraft, white ribbon/ricrac and summer all go together!  Lots of dimension to this card! 


Supplies:  American Celebration Stamp Set; PacificaKraft, Cranberry & White Daisy cardstocks, FanFare WOTG kit; Sky & Pacifica Exclusive Inks, white mini ricrac (retired); pewter conchos (retired); white grosgrain ribbonclear sparkles; border punch.


Monday, June 27, 2011

Event Calendar

So I'm sure you may be wondering what an "Event Calendar" is.  It is also known as a Perpetual Calendar.  It is a calendar that has no year on it, just the days of the month by number so that you can record all the birthdays, anniversaries, and important dates you need to remember. The Event Calendar can be used year after year!  CTMH's Event Calendar looks like this:


And, when you see something so blank you just have to stamp on it.  We created this calendar over two workshops.  Below are the top and bottom of calendars:

JANUARY is credited to Brenda Frerichs (she is amazingly talented!)

JANUARY bottom:

FEBRUARY top:


MARCH - This one came from an event calendar swap and I'm not sure who the artist was:


APRIL:

MAY:

JUNE - I think I saw this on the Consultant Board and loved it but didn't note who the artist was:


JULY:


AUGUST (cracked glass technique - although it's hard to see the cracks):

SEPTEMBER - from an Event Calendar swap - artist unknown.

OCTOBER - Event Calendar Swap by Andra Stone

NOVEMBER:

DECEMBER

I love these Event Calendars because the are not only FUN to look at, you can see what is up and coming for that month at a glance! 

Saturday, June 25, 2011

More Adventures in Studio J

I had so much fun creating the girls layout the other day that I had to create one just for their little brother Xan-Man (Xander)!  I discovered some other neat things in Studio J that you can do with pictures.  When you learn design principles, one of the things you learn is to keep your viewer's eyes focused in on your page.  So, instead of having an airplane flying off the page (which makes the viewers' eyes veer off the layout), you turn the plane around so that it is flying into the page.  You get the idea.

Well, in the picture below, my son and grandson's eyes were looking off the page and I wanted to turn flip that around so the picture would keep your eyes on the page.  So, I found out that not only can you blow up and shrink pictures right there on the page, but you can flip them horizontally (or any other way you want).  I am having SO much fun!  Here's Xan-Man's layout (you can click on the pictures to make larger to see it better):


Larger detail of left side of layout:

More detailed view of the Right side of layout:
When I first created the layout (I knew which one I wanted) but the papers I first chose were the Wings.  While it was a spectacular layout, it was just not for a boy--too many butterflies.  You wouldn't believe how easy it was to switch the papers!  Then a few switches of the MyStickease and voila!  Not only is Studio J easy to use but it is really FUN!  And, if nothing else, it gives you some terrific ideas for classic scrapbooking.  It is FREE to create a .jpg from now until the end of June.  Believe me, if you have a few minutes, you should go for it!!

Happy scrapbooking either way (classic or Studio J)!!

Friday, June 24, 2011

My Experience with Studio J

I admit, I'm a skeptic!  I logged into Studio J and decided I would upload some pictures of my granddaughters having amazing fun in their little pool in their front yard in Butte.  The laughter that comes from those two girls when they are having fun is SO infectious!  Anyway, here is the results (be sure to click on the pictures so you can see the detail because the detail is amazing!):

Here is a more detailed picture of the Left Page:

And a more detailed picture of the Right Page:


All I can say is this was AMAZING fun to create this layout!  It took me about 2 hours because I was familiarizing myself with the program as well as totally experimenting with all the embellishments, the stickers, the buttons, the ribbons and a whole host of other options--including layouts that were already set up and unbelievable selection of papers!  (OK, in case you may have noticed I did drop a honey colored button on one of the pictures that I didn't notice until now, but oh well when I get these printed, I'll update it).

Until the end of June, CTMH is offering a FREE .jpg file (which you can at any time choose to have it printed in very high quality CS weight 12" x 12" pages).  All you have to do is go here:  create yourself an account (if you don't have one already) and log in and let your creative juices flow!  It's FREE and you will have a super darling download --the link will come to you in an email after checkout.  If you have questions and want to get a membership or know more about a membership, email me!

Wednesday, June 8, 2011

Newsprint Rub-ons from CTMH

I always enjoy a little information video now and then and thought you might too.  You never know where you are going to pick up some new design tips or learn something new!


Enjoy!

Tuesday, June 7, 2011

Teacher Appreciation Gifts & Tutorial

With my two granddaughters in school, I had the opportunity to make some teacher appreciation gifts they could take to the teachers to say so-long and thank you.  So, here is what I made for them (you can click pictures to see details):

We have a decorated paper bag, a microwave popcorn covered, box of 9 nuggets, a water bottle and a thank-you card.  The colors are lilac mist and key lime.  I LOVE this combination!  It is actually paper I bought in 2003 and have been saving for that perfect occasion (paper horder here).  Here are some close ups of each of the pieces starting with the card:

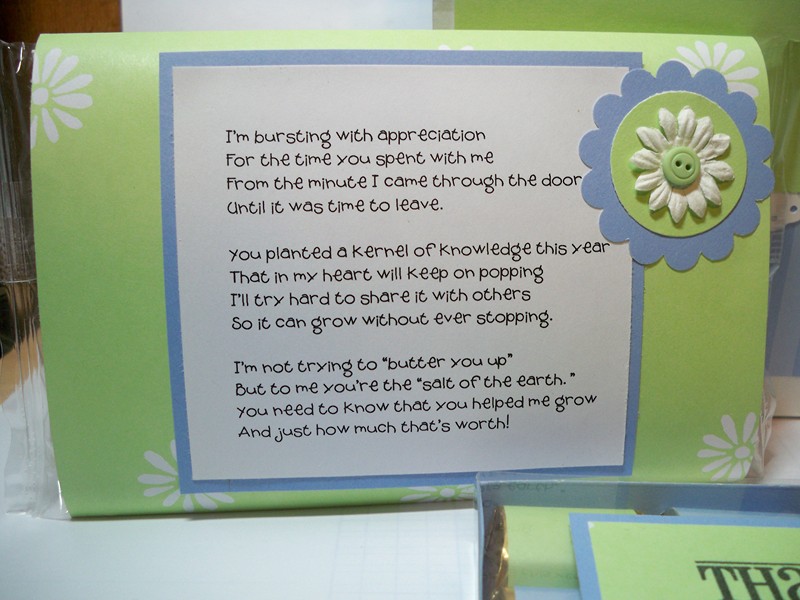
Popcorn package is next.  If you click on the picture you can more easily read the poem:


Next is the box of 9 Hershey nuggets:

Next is a picture of the decorated bag.  I later made a tag that says "Just for You" but it's not pictured:

Next is the 16.9 oz. water bottle that holds a crystal light package for just that size bottle:


A close up of the Crystal Light holder:


And another look at the Crystal Light holder:

One more bottle shot:

Now for the tutorials for the items:

First the Popcorn wrapper:

1. B&T paper cut to 6-1/4" x 9-3/8". Score at 2-5/8" and 7-1/8".  See below--click photo to see more details:


Water bottle label:

For a 16.9 oz water bottle, cut a strip of 9" x 3-1/4".  Wrap and seal around bottle.

Crystal Light packet holder:

Here are the measurements that I used for the holder--works better for the 16.9 oz bottles:

1.  Cut a piece of cardstock 2-1/4" x 9".  Score at 2-1/4" from top and from bottom.
2.  Cut a piece of B&T paper at 2 x 4.
3.  Watch instructional video from Chic n Scratch here:  http://chicnscratch.typepad.com/chicnscratchlive/2008/07/water-bottle-holder.html
4.  You can find written instructions as well here:  http://blueeyedblessings.blogspot.com/2009/06/water-bottle-tag-drink-holder.html

9 Nugget Box:

1.  Download the template here:  http://www.scribd.com/doc/57263003/Nugget-Box-9.
2.  Create it with cardstock but make sure you use a STRONG adhesive like Score Tape to hold your box.
3.  For the "lid cover", I used a sheet of acetate because I decorated all the little chocolate nuggets.
4.  For nugget wrappers, use a 1" x 3" piece of B&T paper.

Card:

The card is a Standard size card (4.25" x 5.5") and uses the Dragon Fly & Friends stamp set (a retired wooden stamp set from CTMH).  There is glitter on the winds and I used the Diamond Focus layout from the CTMH Originals Card Confidence Program Book.  Also, there is prisma glitter on the wings.  The inks are Lilac Mist and Key Lime.

I hope you get a chance to do a fun project like this!!  Thank the Good Lord for Grandkids!!  Have a super day!

Related Posts with Thumbnails