Friday, June 24, 2016

Quick Cards from New Cut Above Card Kits

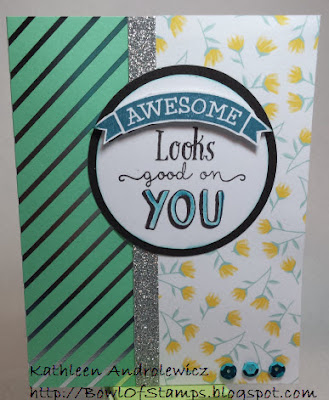
In the Seasonal Expressions 2 book there are two daring card kits called Cut Above Fiesta Card kit (of the mint and silver variety) and Cut Above Jubilee Card kit (hot pink and gold variety).  Aren't they gorgeous on their own?  What I love about these cards is how quickly you can create a card and how beautiful they look with other paper!  Here is what the cards look like in the kit:


So, here are some cards that were made with the May Happy Time papers (retired) and other papers:


Next we have some non-Close To My Heart paper and you can really see the shine on the silver stripes.  I love how nice it goes together with this paper, too:


Papers:  Cut Above Card kits; Happy Time Paper Pack, Black and White Daisy Cardstocks;
Stamps C1644 Beyond Awesome; Celebrate With Cake (May SOTM, retired)
Inks:  Watermelon (Retired), Pacifica and Black Exclusive Inks; VersaMark & Gold Embossing Powder
Other: 

Featured Stamp sets:
Always looking for a way to do things quickly when I'm in a hurry.  This really fit the bill!


Thursday, June 9, 2016

Jewelry Workshop

I have been eyeing Close To My Hearts Base & Bling jewelry for a couple of years now, but it wasn't until this year's selection of chains, pendants, charms, and beads that I actually wanted to order some of them and try them.

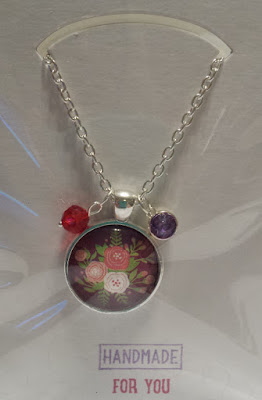
They are really fabulous and are so dressy!  I think before I thought they just weren't right (at least for me).  All the Base & Bling items are so well made and are so classy.  Well, my little group decided we should do a workshop to make some necklaces.  Here are few of the items that we made below:


The necklace above is on a necklace card holder.  It was one for my daughter and has the birthstones of her two daughters.  I colored the rhinestone bead with a Shinhan lavender marker to make the purple color.  The next one (below) was made for my daughter-in-law and has the beads of her three children.  Both of these were Mother's Day presents.  I embossed the letter "A" with silver embossing powder.


The last one was a graduation present for my oldest granddaughter who just graduated from the 8th grade and will be going to high school next year.  She is "Fearless"!


Here are the supplies that I used for these:

Z3160 Faux silver 30" chain with 2" extender
Z3153 Faux silver circle pendant
Z3154 Faux silver square pendant
Z1966 Circle Glass Cover
Z1967 Square Glass Cover
Z3143 Teal Bead
Z3141 Black Bead
Z3110 Heart Charm
Z3174 Lovely Blooms Style Sheet
A1182 Etched Alphabet
Z891  VersaMark Ink Pad
Z2067 Ranger silver super fine embossing powder
Z3196 Base & Bling Necklace Cards

These are beautiful and are truly worth a closer look!

Monday, June 6, 2016

Paper Cone Wreaths Workshop and Tutorial

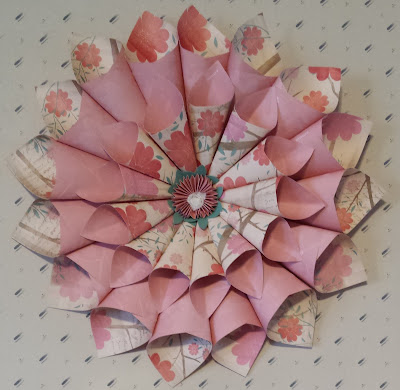
There is nothing I love more than having time to sit down and make cards!  However, it is always fun to change it up to do some paper engineering or construct something different like making paper wreaths.  So a while back we did a workshop to make some paper wreaths.  There were a few that got away before I got pictures but here are some pictures of the ones I was able to get.  Each wreath took about 6 sheets of 12 x 12 decorative two-sided paper (and/or cardstock).


The nice thing about these is that they are SO light-weight that they can hang anywhere.

Here is what you need to make this project:

Large round piece of chipboard/stiff cardboard 8" to 9" in diameter
6-7 pieces of 12" x 12" double-sides decorative papers/light cardstock
Some white quick dry liquid adhesive (can use glue gun)
3/8" ribbon (for hanging the wreath)
something to decorate centerpiece

1.  Cut about sixteen 6" x 6" squares of double-sides paper to make large cones.  Glue each piece into a cone shape.

2.  Cut about twelve 4" x 4" squares of the same or different paper to make smaller cones.  Glue each piece into a cone shape.

3.  With your 8" to 9" circle out of cardboard (like from a cereal box, or a very stiff paper plate, etc.) use your marker to divide the circle in quarter.  I found that if you divide it in quarters, it will help to better place the cones.

4.  I used white glue (Scotch Quick Dry Adhesive) to glue the cones in place.  The white glue is a pretty strong adhesive.  Glue a cone made with the 6" x 6" squares on each quarter line drawn with the point in the center of the circle.  Then fill in with additional cones between the four cones you first glued down until your circle is covered.

5.  Next with the cones made from the 4" x 4" papers, they will glue nicely by placing them in the valley between cones of the 6" x 6" cones.  (See below).  Complete the smaller circle of cones.


6.  I completed the center of the wreath by making a paper yo-yo flower from two 2" x 12" strips of cardstock fan-folded every 1/4" and glued into a circle.  Then I added a paper flower made from the Art Philosophy Cricut cartridge (see below) out of cream colored decorative papers.  I don't remember the measurements (made a long time ago and thown into bag for later use when the right project came along).

7.  Attach ribbon to the cardboard on the back and hang.  Voila!


Friday, June 3, 2016

Flash Sale Friday!


News flash! During the month of June, Close To My Heart's offering great deals on bundles of discounted Close To My Heart products every weekend! Check my shop online site at 3:00 PM (MST) today and each Friday during June to find a new set of bundles. There will be lots to choose from, but you’ll need to snatch them up quick, because they’re only available through the following Monday while supplies last! Bundles will be available at various discount levels and price points throughout the month, so check every weekend to see the new offerings. Remember, these discounts won’t last forever, and some will be gone in a flash, so act quickly to score the best deals!

Dates:
Friday, June 3, 2016 at 3:00 pm (MDT) – Monday, June 6, 2016 at 3:00 pm (MDT)
Friday, June 10, 2016 at 3:00 pm (MDT) – Monday, June 13, 2016 at 3:00 pm (MDT)
Friday, June 17, 2016 at 3:00 pm (MDT) – Monday, June 20, 2016 at 3:00 pm (MDT)
Friday, June 24, 2016 at 3:00 pm (MDT) – Monday, June 27, 2016 at 3:00 pm (MDT) 


Each week there will be several bundles to choose from, and each one contains products that work together so you can turn them into finished projects!  Check out the Make It from Your Heart blog as they showcase artwork made using products available through each weekend's flash sale!


Thursday, June 2, 2016

Easter Flashback Part 2

One little project from SVG Cuts that I had fun making was the little Egg Hut from Cottontail Village.  Mary and Leo of SVG Cuts was such an amazing team!  They were the true meaning of one plus one = three.  Anyway, Mary is an amazing designer and this little Egg Hut is no exception!  Here is my version done with Close To My Heart's Kaleidoscope Kit.


Truly is that just adorable!!  Here is what is on top:


And here is the back of this:


Papers: Kaleidoscope Workshop, Citrix Textured Cardstock (Ret.) Gypsy, Cotton Candy Cardstocks;
Stamps:  None.
Inks:  None.
Embellishments Z1986 Pink Shimmer Trim; Gemstones and Flowers from Hobby Lobby
Other:  Cricut Design Space

Hope you found this a fun project as I just loved putting it together!


Wednesday, June 1, 2016

Easter Flash Back

I have a few cards that were part of my workshop in March that I didn't get to post.  I saw egg shaped cards on Pinterest, but found they didn't come from a blog and I'm not sure who the credit should go to; however, I do know it must have been a Close To My Heart consultant (so if it is you, let me know and I will credit your work).  My cards aren't exact replicas but pretty close!  Anyway they were fun, happy cards and it was a fund workshop!!  Here they are:


Papers:  Kaleidoscope Workshop, Penelope Workshop (Ret.) Kits; Gypsy, Cotton Candy, Pear, Canary, and White Daisy Cardstocks;
Stamps:  C1638 Spring Critters & Z3207 Spring Critters Thin Cuts (Ret.)
Inks:  Black, Cotton Candy, Autumn Terracotta, Gypsy, Pear and Canary Exclusive Inks
Embellishments: Z1986 Pink Shimmer Trim; Z3025 Blue Shimmer Trim; Z3024 White Shimmer Trim; and Z1919 Purple Shimmer Trim
Other:  Cricut CTMH Art Philosphy cartridge

Above were my Critter, cards for the kids and below was my religious card.  Courtney Lane Designs blog had a Cricut Explorer file for this card.  I couldn't find her files but here is the link to my file for this card in Cricut Design Space:  https://us.cricut.com/design/#/canvas/37726858 .


Papers:  Thistle, Canary, Crystal Blue, Parchment (ret.) and White Daisy Cardstocks
Stamps:  A1184 Rejoice (Ret.)
Inks:  Crystal Blue Exclusive Inks; Versa Mark
Embellishments: Z1927 Damask Embossing Folder
Other:  Cricut Design Space

I don't know how I got so far behind in posting!  I think between traveling and sickness, I just got beyond behind.  I will catch you up and tomorrow will have a stamp of the month artwork piece for you!  Stay tuned for more artwork from the past!

 
Related Posts with Thumbnails